FAQs
- Do you have sufficient data on your phone?
- What version of the app have you got installed? You can see this at the bottom of the app’s sign-in page.
- – You can find and download the latest version in your smartphone’s app shop.
- – If it is an older version, you have to update the app to the latest version.
- – It is advisable to enable auto updates for the app on your phone’s settings.
- Is your GPS location services on? It must ALWAYS be on!
- Did you grant all permissions in the app?
- Did you allow all notifications in your smartphone’s settings?
Download and install the app from Google Play (Android), App Store (Apple) or AppGallery (Huawei).
- Type in your phone number and click on “Submit”.
- An OTP will be sent to your smartphone via SMS.
- Type this number in the available field, and click on “Submit”.
- You are now signed in.
Question: Why didn’t I receive an OTP when I signed in?
A poor network can delay the sending of the OTP. Try to find a place where your signal is stronger and wait ten minutes. If you have still not received an OTP after ten minutes, try signing in again.
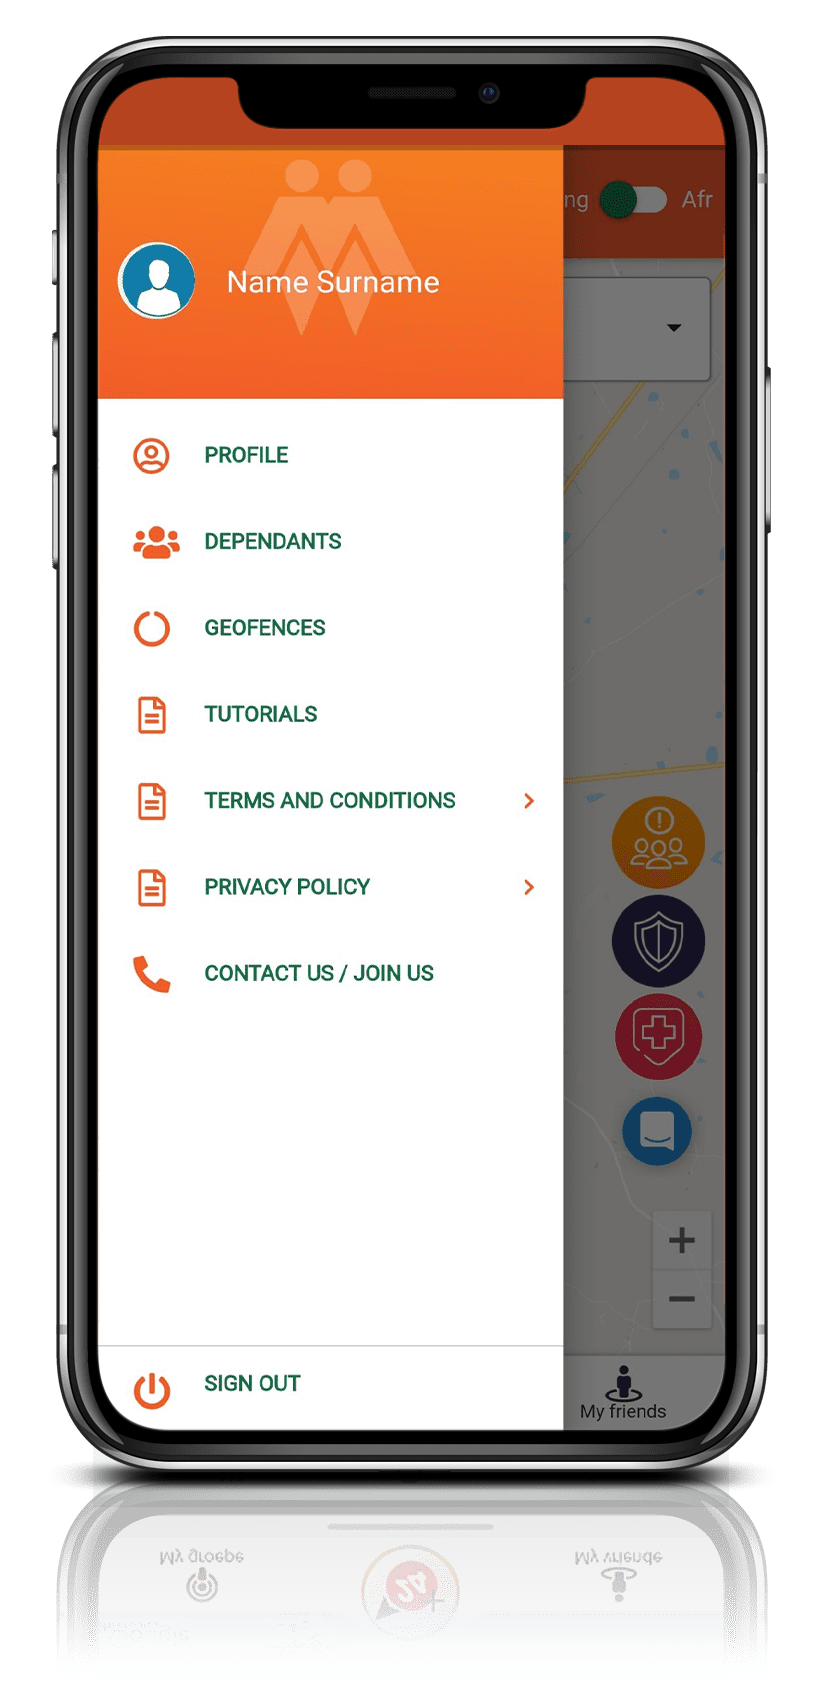
- Click profile icon top left to open the menu.
- Select “Profile”.
- Upload a profile picture. You will be prompted to allow access to photos and media. Click on “Allow”.
- Select a picture – crop or move your picture within the guides and click “Done” (bottom right corner).
- A pop-up message will confirm that your picture was uploaded.
- You will be taken back to the profile where you must enter your name and surname.
- Click on “Save”, which takes you back to the menu.
- On the main screen, click on “My friends” (bottom right).
- You will be taken to the “My family/friends” window.
- Click “Refresh family/friends” (top left).
- Once the list has refreshed, click on “Invite family/friends” (top right).
– You will be prompted to share via your preferred platform (e.g. WhatsApp, Outlook and Facebook).
– Invite a family member or friend via WhatsApp, Outlook or Facebook.
– A link will be sent to them to download the app. - Once your family member or friend has installed the app, click again on “Refresh family/friends”. They will now appear in your family/friends list.
- Once they appear, click on their profile or name.
- A window will open where you can manage your family member or friend’s preferences.
- Select “Notify in case of emergency” if you want them to receive emergency alerts from you.
- You can also call by clicking on “Phone” afterwards.
– This will prompt you to use your phone.
– Select phone and click on “Dial”.
Question: Why can’t see any family or friends in my family/friends list?
Make sure you have their number saved on your phone (in your contact list) and the person has downloaded and installed the App. Once they are saved on your phone and they have downloaded and installed the app, refresh your family/friend list and their name will appear.
Question: Why didn’t I receive push notifications from family or friends when they send an alert when the app is closed?
Go to your smartphone’s settings, select “Notifications” and allow “All notifications”. Check your cellular network and ensure there is sufficient signal as this can delay notifications.
- Click profile pic (top left) to open the menu.
- Select “Dependants”.
– Select “Add dependants” (top right).
– You will be prompted to add a dependant (click “Yes”).
– You will then be prompted to add more dependants or go back (“Add more”).
– Add another dependant and click “Yes”.
– You will once again be prompted to add more or go back (click “Go back” when you have finished adding dependants).
Question: Why can’t I see or add dependants?
Make sure you have their number saved on your phone (in the contact list) and that the person downloaded and installed the app. Once they are saved on your phone and they have downloaded and installed the app, click on “Refresh family/friends” and their details will appear.
- Click profile pic (top left) to open the menu.
- Select “Dependants”.
- Click on your dependant’s picture or profile name.
- You will be navigated to the page to allow rights.
- Click “Remove as a dependant” (bottom of your screen).
- Click “Yes” to remove the dependant.
- To grant emergency service permission to nominated family members, click the profile pic (top left) to open the menu.
- Select “Dependants”.
– Click on the nominated dependant’s picture or name.
– You will be navigated to a page where you can grant these rights.
– Select “Allow use of armed response” if you want to grant the dependant this right.
– Select “Allow use of medical emergency response” if you want to grant the dependant this right.
Question: Why can’t I send an alert on behalf of my dependants?
You can only send an alert on behalf of a family member if you have added them as dependants. Add them as dependants by clicking the menu bar, then on “Dependants” and then “Add dependants”. You can now activate armed response and/or medical response by clicking on the relevant toggle switches.
- Select “My groups” on the main screen (bottom left corner).
- You will be navigated to “My groups”.
- Click on “Add new group” (top right corner).
- A new window will open where you can select the group’s icon at the top by clicking left or right on the icons presented to you. Select one of these icons.
- Alternatively, you may upload a picture or photograph from your phone by tapping on the upload button to the left of the icons.
- Below this you can name your group by typing in your preferred group name.
- Once you have named your group, you can select group members by scrolling down and clicking on the tick box next to each name. You can select an unlimited number of members for each group.
- Once you have completed this, click “Save” and you will be taken back to the “My groups” page. Here you will see all the groups that you created or are a part of, as well as groups’ names and how many members each has.
- By clicking on the 24+ button at the bottom centre of your screen, you will be taken back to the main screen.
- At the top centre of your screen you will see a square pane that reads “No groups have been selected”.
– Select the pane and chose your group.
– The group members whom you selected for that specific group will now appear on the list.
– Click on the same pane at the top to select a different group.
– The group members for the new group will update on the list.
Question: Why can’t I see or add my family or friends under groups?
Make sure you have their numbers saved on your smartphone’s contact list and that they have downloaded and installed the app. Once they are saved on your phone and they have downloaded and installed the app, click on “Refresh friends” and they will appear.
Question: Why can’t I see my family or friends on the home page map?
Did you create a group and invite your family and friends? Did your family and friends accept your group invite? Did you select a group on the home page map? Tap on top centre box and select the relevant group.
- Click on “My groups” on the main map screen (bottom left).
- You will be navigated to “My groups” screen.
- Select the group you wish to delete.
- The group window will open; click on the red trash can (bottom left).
- You will be asked if you want to delete the group and whether you are sure.
- Click on “OK”.
- Your group should be deleted.
- You will see three floating icons on the home screen (middle right):
– Family or friend alert – top people icon, orange
– Armed response alert – middle shield icon, blue
– Medical alert – bottom medical icon, red - To send a family/friend alert, click on the orange icon (family and friends).
– You will be prompted with a three-second countdown
– You can cancel this alert before it is sent (for example if you accidentally pressed the button or if you no longer need assistance).
Please test this.
– Once the alert is sent the icon will turn red.
– Your selected family or friends will receive an alert from you in the app with your location and an alert that you need assistance.
– When your family or friends opens the alert, you will be informed that someone has opened the alert.
– When they navigate to you, you will be notified that they are on their way.
– You can cancel the family or friends alert by clicking on the red friend icon.
– You will be prompted to cancel or complete the family or friends alert (“Are you sure?”). Click on “Yes”.
– Once the alert has been cancelled, it will disappear from your selected family or friends’ apps. - To send an armed response alert, click on the blue icon (shield).
– You will be prompted with a three-second countdown.
– You can cancel this alert before it is sent (for example if you accidentally pressed the button or if you no longer need assistance).
Please test this.
– Once the alert is sent, the security company as well as your selected family will be notified of your alert.
– Your alert will go to the respective security company’s national operations centre as well as that of Response24 together with the user’s correct details and GPS location. - To send end a medical response alert, click on the red icon (medical cross).
– You will be prompted with a three-second countdown.
– You can cancel this alert before it is sent (for example if you accidentally pressed the button or if you no longer need assistance).
Please test this.
– Your alert will go directly to ER24 and Response24’s national operations centre together with the user’s correct details and GPS location.
– Once the alert is sent, your selected family will be notified of your alert.
Question: Why don’t I receive friends alerts from family or friends?
Make sure you are marked as “Notify in case of emergency” on your family members or friends’ app.
Question: Why don’t my family or friends receive my alerts?
Make sure you marked these family members or friends as “Notify in case of emergency” in your friends list.
- When on the main screen, click on your dependant’s photo.
- You will be prompted with a tab (bottom of the screen) with your selected dependant’s photo and name, where you can select the below actions:
– Navigate – Navigate to your dependants using Maps; you will be redirected to the maps application on your phone to be able to navigate to that person. Check that the location is correct and corresponds to the location on the AfriForum 911 emergency app.
– Trigger an armed response alert – You can send an armed response vehicle to your dependant’s location if you have enabled their rights; this will show as ”Disabled” if you have not given them rights.
– The alert will be sent with the details of your dependant that you have selected to the national operations centre.
– Trigger a medical response alert – You can send a medical response vehicle to your dependant’s location if you have enabled their right; this will show as “Disabled” if you have not given them rights.
– The alert will be sent with the details of your dependant you have selected to the ER24 and Response24 national operations centres.
– Message – You will be taken to the in-app message pane where you can type and send a message to your selected dependant. You can also receive messages here.
- On the main map screen, ensure that the correct group is selected (top centre box).
- Long hold the area or location that you want to geofence for approximately two to three seconds.
- You will be prompted with the geofence tab (bottom of the screen):
– Name your geofence, e.g. “School”.
– Click on “Radius” by sliding the blue dot along the white line (left or right to adjust radius in kilometres).
– Select “Notify when entering geofence”.
– Select “Notify when exiting geofence”.
– Click on “Save”. - The geofence will appear on the map where you clicked.
- Ask a friend or dependant to test the geofence for you by entering or exiting the area.
– You should receive a notification when your friend or dependant enters the geofence.
– You should receive a notification when your friend or dependant exits the geofence.
You can also create a geofence as follows:
- On the main map screen, ensure that the correct group is selected (top centre box).
- Go to the main menu and select “Geofence”.
- To search for an address, click on the plus icon. Type in the street address and select it from the dropdown list.
- Set the geofence radius by sliding the slider right to left and then turn on the notifications by clicking on the two toggle switches.
- Click on “Save”.
- To return to the home screen, click on the back arrow in the top left side of the screen.
Question: How do I set up a geofence?
Long hold on the map. The geofence tab will appear. Name the geofence and drag the radius line back or forth to select the radius distance. Set the toggle switch to notify you when the geofence is entered or exited. Then click on “Save”. You will now see the geofence on the map.
Question: Why don’t I receive push notifications when my family and friends enter or exit the geofence when the app is closed?
Go to your smartphone’s settings, select “Notifications” and then “Allow all notifications”. Check your network and ensure the signal is sufficient to receive notifications, as network signal can delay notifications.
- When on the main map screen, click once on the geofence that you wish to delete.
- A geofence tab will open (bottom of the screen).
- Click on the red trash can (bottom left).
- You will be asked if you want to delete the geofence and whether you are sure.
- Click on “OK” to delete it.
- The geofence will disappear off the main screen.
- Click on the profile pic in the top left part of the screen to open the menu.
- Click on “Tutorial”.
- Click on he link https://www.afriforum911.co.za/en/download/.
- Click on the profile pic in the top left part of the screen to open the menu.
- Click on “Terms and conditions”.
- Click on the link https://afriforum911.co.za/en/terms-and-conditions/.
Question: Why do I need to read the terms and conditions?
It is important to understand the terms and conditions before downloading and using the application. This include the limitations to the AfriForum 911 services, radius of response, etc.